Revised 12/28/2019
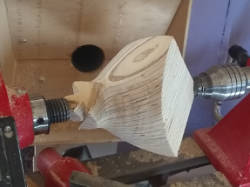
Actually the process is pretty much the same as making a regular bowl EXCEPT one starts with a cube and the way the cube mounted in the lathe in the first initial step. But sanding it can be a little tricky to avoid damaging ones fingers on the points.
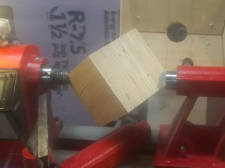
The steps are illustrated when I turned a 3 sided bowl form a 3-3/4 inch cube. The process was designed to pretty much show the traditional way to turn a 3 sided bowl with the simple change that I cut off the right end of bowl using the jig developed in Geometry page, Part 5. This was required because I don't have an live tail stock with a large opening. (It is not really necessary to get the accurate cut provided by the jig in this situation.)
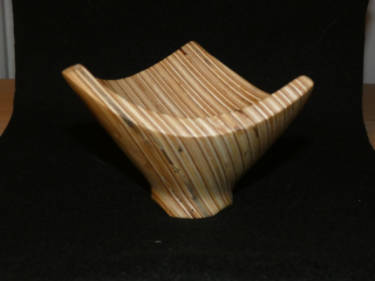
While the turning process was traditional, the shape of the base is a little different. In most of the images taken from the internet the bowls have circular bases, but this bowl has 3 small feet at 60 degree offsets to the points on the top of the bowl. The advantages are wasting less wood and adding height and stability to the bowl. Those feet take advantage of the natural shape of the turning cube as seen in a picture just below Figure 3 in the Geometry page. Most turners put the bottom of the bowl above the turnings cube's "waist" instead of below it. Had I decided to have a round base, the height of the bowl would probably have been reduced by about 5/8 of an inch to gain stability by giving the base the same diameter as provided by the feet.
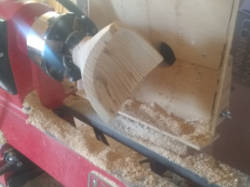
A second goal of this turning was to experiment using a glued up block made from 1/4 inch underlayment plywood. This plywood has been factory sanded for a uniform surface but the interior still has the holes that might expect with plywood.
The general idea of the traditional 3 sided bowl is:


Some things that can go (and some did) go wrong in the process which will result in the points not be equal: The cube can a little dimensionally out of shape or not complete square. The cube is not mounted exactly centered in the lathe. (The grain in the wood may push it off center when pressed by the tail stock.) Remounting it in the 4 jaw chuck might be a little out of line.
Comments about using the laminated plywood cube: There were several holes on plywood which were partly filled with glue and saw dust. They tended to be hard on the edges of the sandpaper before the holes were filled. There was some glue joints that spit apart but for the most part they seemed to be a defect in original plywood, not in my gluing the sheets together. In one case thin CA glue was used to reglue a separation in the original plywood lamination. Fortunately, the pattern presented by the plywood tends to hide the defects. I also noted that turning and sanding seemed easier than when using solid wood.

Alternate: The 2nd link below shows an alternate method for step 1. Both ends of the cube are cut off. This allows mounting the cube center to center just like one was turning a spindle. The picture on the left illustrates this mounting. The author used his jig shown in Part 5 of the Geometry section to make accurate cuts but 100% precision is probably not needed.
Links: Here are some links to turning a 3 corner bowl.
http://avwoodturners.org/downloads/three-cornered-bowl.pdf
This shows making a pretty standard bowl.
http://www.armadillowoodworks.com/pdfs/three_sided_bowl.pdf This shows making
a three corner bowl with a three corner base. The author cuts off both ends of the
cube and start turning as it were a spindle.
https://www.youtube.com/watch?v=l3F7jGlzQgw This 16 minute Youtube
video shows a pretty typical process of making a 3 sided bowl.
Youtube search shows plenty of videos showing the complete process but they will take longer
to view.
Maintained By: James Brink (brinkje@plu.edu).