Read me file for the Bezier Demo program
"http://www.cs.plu.edu/~brink/Java/Bezier/Home.html"
and
a standalone application not tied to your web page.
(Exactly the same program but run differently.)
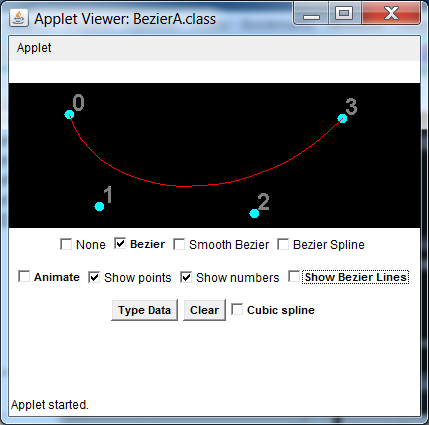
This demo shows Bezier curves.
By default the Bezier checkbox is checked. To use this application/applet, click 4 points in the black area. You will see the Bezier curve that goes through the first and last points. They are referred to as "knots". The second and third points are called "control points". To see how they control the curve, drag a control point and see how the curve is reshaped. The points are numbered 0, 1, 2, and 3. Points 1 and 2 are the control points.
The Bezier curve is actually a parametric function with piecewise cubic polynomials determining the x and y values.
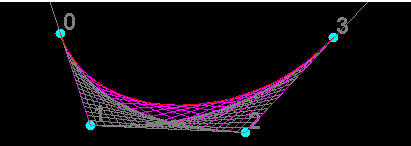
If Show Bezier Lines is checked, a set of "strings" is drawn. They form an envelop for the Bezier curve.
If Animate is checked, the strings are replaced by 3 moving lines. As they move, the shape of the Bezier curve is formed. The three lines correspond to one set of strings shown previously.
You can click the Clear button any time to start over. You can remove a particular point by right clicking it.
What if you click additional points? Each time you add 3 additional points, a new Bezier curve will be added. However, the joints between the curves are not normally smooth. Sometimes the connections will actually be pointed.
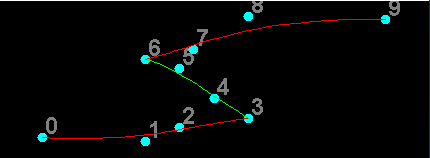
Want a somewhat smoother curve? Click the clear button and check the Smooth Bezier box and start selecting points. The first 4 points will generate a curve just as before. However, when you click the 5th point, you will actually get 2 points. The point labeled 4 is selected for you in a manner that is the reflection of the point labeled 2 about the point labeled 3. The point you selected with be labeled 5. Click one additional point and a second Bezier curve will be drawn. Notice that the result curve looks smooth around the point labeled 3. If you drag points, 2, 3 or 4, points 2 or 4 will be moved to insure that curve continues to be smooth. If desired, you can click additional points. Every time you add 2 points, an additional control point is also added and a new curve is added.
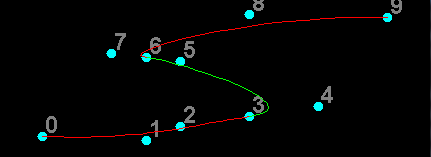
The resulting curve is smooth. However if you have ever studied calculus, you would note that while the first derivative is continuous at point 3, normally the 2nd derivative is not. To make the second derivative continuous, we have to give up specifying any control points and let a complicated calculation determine them. This is done using the Bezier Spline. Clear and start clicking points. Now starting with the second click, a new section is added. The control points are calculated automatically. They cannot be adjusted at all. Only the knots can be moved.
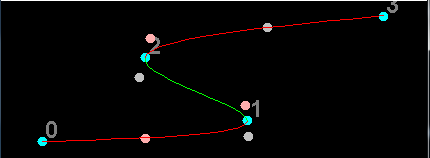
The image shows the resulting Bezier spline. The blue dots are the supplied data points while the pink and gray points are the control points created mathematically.
Clicking the None checkbox hides all of the Bezier curves. This may be useful if the "Cubic Spline" box is checked.
If you check the Cubic spline, you will get a parametric "Cubic spline" that goes though all the points. It is designed in such a way that there are cubic polynomials for x and y between every 2 points that are determined in such a way that the first and second derivatives are continuous. The resulting curve is exactly the same as the Bezier spline. However it is calculated in a different manner and the control points are never determined.
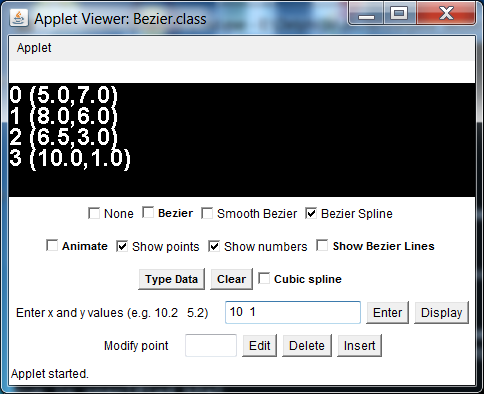
If you click the Type Data you input data points by typing instead clicking. To use this feature begin by typing 2 numbers (for example,10.2 and 5.2) in the Enter x and y values text box. Then click the Enter button. The values will appear in the black area. Repeat this process with addition pairs of values. When you are finished, click the Display button. The curve specified the checkboxes is drawn after the points are scaled to fit the black drawing area. If desired you can add additional points by just entering the data and clicking the Enter. Click Display button again to display the revised curve. You can modify the curve by clicking and dragging but clicking "Display" only processes points that have been typed.
Because the Bezier Spline checkbox was selected, the Bezier spline was drawn.
If you make a mistake you can correct it using the Modify point and either the Edit, Delete or Insert buttons. In these cases, you will need to type the point number in the Modify point text box. In case of editing or inserting, you also will have to supply a new point in the Enter x and y values box before clicking the corresponding button. In the case of "Insert", the new point is inserted before the existing point.
This application/applet can be run as a application (using the "java" command), as an applet with the appletviewer, or as an applet on a web page (assuming the browser allows Java applets.) One can adjust the size of the application or appletviewer window. You can download the source code, the class files and this file using the link http://www.cs.plu.edu/~brink/Java/Bezier/Bezier.zip
For more information about Bezier curves, you might want to look at the link
http://en.wikipedia.org/wiki/Bezier_curve.
James Brink
Revised 7/9/13